Servicing
Sinclair Computers Part 3
This month we start On the Spectrum. Let's first take a quick
look at the development of this machine over the past few years. There have been four
standard PCBs marked issue 1, 2, 3 and 3B. After each change a few modifications were
generally required to make the new design operational or to implement further improvements
- even the 3B board has now been modified. It's often possible to determine the issue
number without opening the case. The clues are as follows:
(1) If the rubber keys are a light fawn colour it's an issue 1 board.
(2) If the keys are dark grey, look into the edge connector slot to see whether an
aluminium heatsink is visible -especially at the power socket end. If you don't see the
heatsink it's an issue 2 board which has the heatsink near the forward corner of the
board, under the keyboard.
(3) If the heatsink is visible it's an issue 3 or 3B board - there is very little
difference between them.
The Spectrum Plus usually has an issue 3B board, but watch for earlier models that have
been fitted with a Spectrum Plus keyboard kit - this can now be obtained separately.
In this write-up I shall be dealing primarily with issue 3 and 3B models, though I hope to
mention the earlier models where the differences are important.
Circuitry
The Spectrum differs from the ZX81 (see last month) in two major respects. First it's
designed to carry the full memory (48K RAM) on the PCB. Secondly the TV display is
serviced automatically by the ULA chip and a dedicated ic. (type LM1889) which also
provides the video output in colour. This latter arrangement explains why with an
otherwise dead machine a vertical striped pattern of "bricks" flickers up and
down the screen and goes on working even when the CPU has been removed.
Which reminds me - I haven't explained why we're not providing a block diagram for the
Spectrum. I don't see that this would be of much advantage. Apart from illustrating the
two differences I've just mentioned it would be much the same as the block diagram given
for the ZX81. Instead I'm showing most of the circuitry. Which by now should be fairly
self-explanatory.
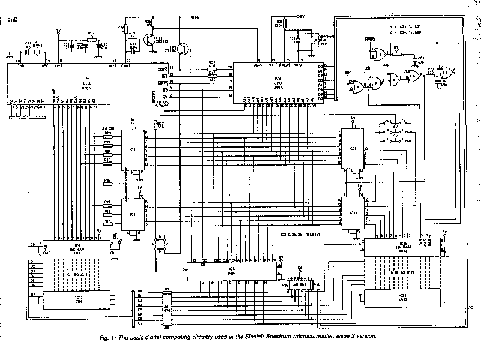
Fig1. (Thumbnail. Click here for full size)
The basic digital computing circuitry used in the Sinclair Spectrum Issue 3
The first circuit section is shown in Fig. 1. This includes the basic digital computing
circuitry. For clarity, most of the decoupling and smoothing capacitors have been
omit-ted. The input/output circuitry, including the TV output, tape input and output and
the keyboard connections have also been omitted: these will be shown later.
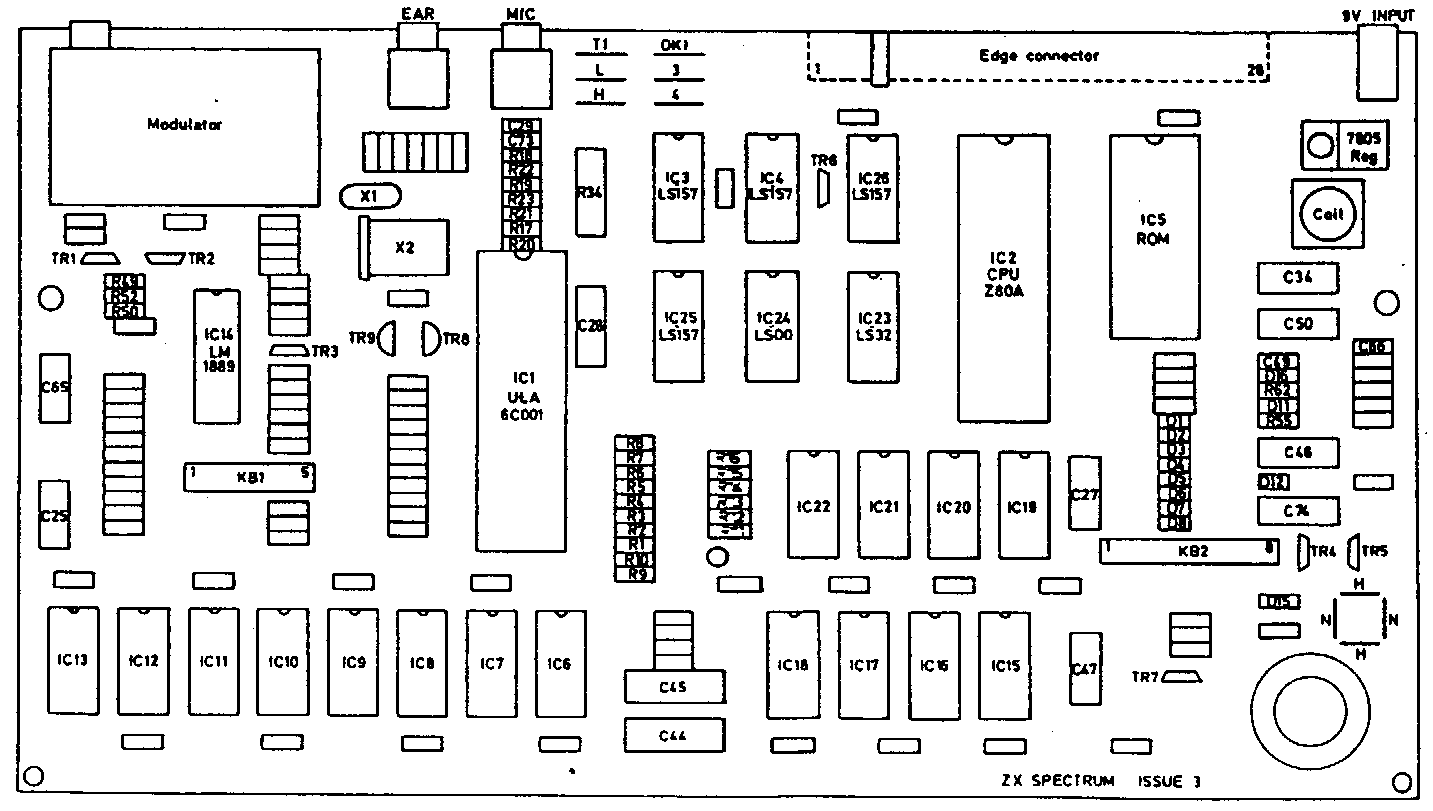
Fig. 2 shows the layout of the issue 3 Spectrum to enable you to find the main components
as we refer to them. The differences between this and the issue 2 board are not very
great. Because of the changed position of the heatsink, the keyboard socket at the
right-hand side of the board has been moved slightly rearwards and the regula-tor is in
the middle of the right-hand edge. Most of these features become obvious when you compare
an earlier issue board with the layout shown in Fig. 2.
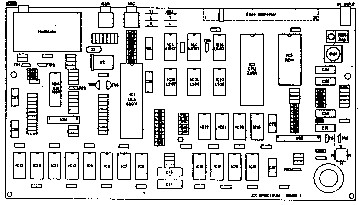
Fig.2 (Thumbnail, Click here for full size)
Layout of the issue 3 Spectrum panel.
Access
You can't do that however till you open up the machine, so here goes:
(1) Turn the machine over and remove the five screws - eight
with the Spectrum Plus.
(2) Turn it back, carefully holding the two parts together. Lift the top, tipping it on to
its rear edge so that the keyboard tails can be removed from their sockets. Remember what
we said when dealing with the ZX81 about the fragile nature of these tails: the Spectrum
is just as vulnerable in this respect.
(3) As with the ZX81, the machine should still initialise when the keyboard has been
disconnected, and on start up should display 'c 1982 Sinclair Research Ltd." on the
bottom line. The keyboard can be left disconnected until this has been achieved.
(4) Before much serious work can be undertaken the heatsink must be removed to provide
access to the components beneath. This is even more important with issue 3 and 3B models
which have a larger heatsink that covers many of the more important components. The
temporary heatsink I use when working on any Spectrum board is shown in Fig. 3. Don't
worry if you cannot find a piece of copper or aluminium exactly the right size - the only
important section is the little bent-up end which has to fit under the regulator. Even
here, if your metal is too thin you can stick another shim of metal to the back so that
the regulator legs are not distorted when you screw the heatsink underneath it.
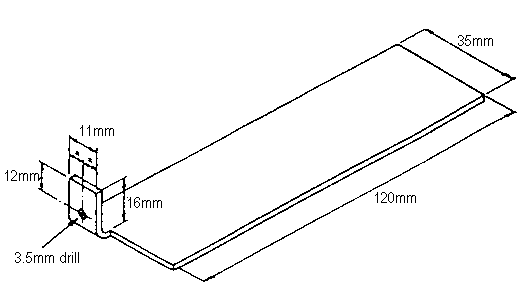
Fig.3 Temporary heatsink for use when carrying out servicing work on the
Spectrum.
Fault Finding
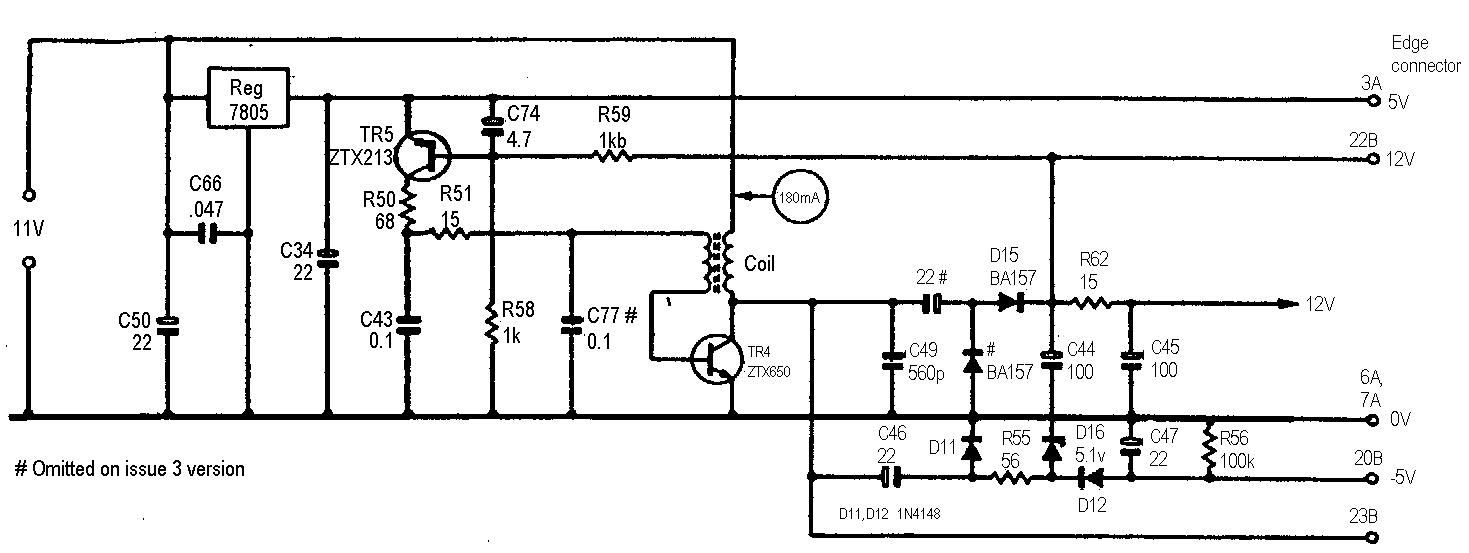
The internal voltage generator circuit is shown in Fig. 4. This is one of the circuit
areas that often suffers when a fault develops. It consists of a 5V regulator and a
blocking oscillator (TR4) whose output is rectified to produce the 12V and -5V lines
required by the 4116 memory i.c's that provide the initial 16K of RAM. An interesting
regulation technique is used: the blocking oscillator's timing capacitor(s) are charged by
the constant-current transistor TR5 whose base is controlled by feedback from the 12V
line. The outputs are taken to the edge connector and perhaps this is the problem. It
seems that TR4 dies when there's the slightest extra load. This is often caused by a
joystick interface being removed or fitted while the machine is switched on and probably
shorting out one of the supplies. But the 4116 memory ic's sometimes develop shorts and
then he problems start.
I've shown the oscillator current in Fig. 4. It's often necessary to supply the board from
a bench supply and monitor this current. With a supply provided for the 5V rail, wind up
he supply to the oscillator slowly from zero. Monitor the current drawn by the oscillator:
if the reading exceeds 300rnA switch off quickly and remove one/some of the memory ic's or
cut the 12V supply tracks to pin 8.
Finding the faulty memory or memories is very hit and miss but if you've a good record at
pontoon or the football pools you may be lucky!
Earlier circuits were slightly different from the issue 3/3B circuit shown but the
differences were often only in the component values and it's worth noting that all issues
use the same component reference number for compo-nents in the same circuit position.
One more point. Because of the omission in earlier versions of the asterisked 22uF
electrolytic capacitor, unless you have the 3B version the 12V line will be at about 11v
even when the oscillator is not working. This can present a very confusing situation, so
ensure that your first check is always on the -5V line, which will be absent if the
oscillator isn't working. The frequency of oscillation, which isn't very critical - or
stable - is about 6.6kHz.
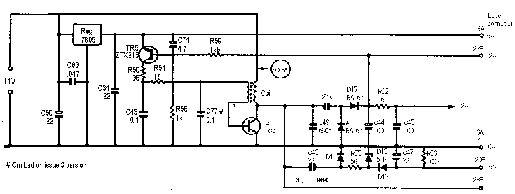
Fig.4 (Thumbnail. Click here for full size)
Voltage generator circuit used in the Spectrum - Issue 3B version. With the issue 3
version R60 is 270 Ohm, C49 is 47nF and the hashed components are omitted. Edge connector
numbers suffixed A are on the underside of the board, those suffixed B are on the
component side (top). The input from the power supply is approx. 11V on load (650mA)
Having eliminated faults in the voltage generator circuit and hopefully in any of the 16K
RAMs, why doesn't the thing work? Assuming that you are still getting the flickering
vertical columns the ULA and the TV video generator chip appear to be o.k., so what else?
Remem-ber that your check on the memory ic's, made whilst repairing the voltage generator
(if necessary), detected only those ic's taking excessive current, not those with other
faults. So first try the piggy-back check I suggested for the ZX81 last month. Clip a good
4116 on top of each of the remaining original memories and see whether this makes a
difference. If the extension memory chips (IC15 - IC26) are fitted they can be tuned off
either by removing the memory chips or IC25 (one of the 74LS157 multiplexer chips).
Altema6vely the 5V supply track to pin 16 of this ic. can be cut, but this is not easy
with the issue 3 board as the track is thicker than usual.
The 4116 memories are also addressed via the 74LS157 multiplexers IC3-4. You may recall
our earlier comment that dynamic RAMs such as the 4116 are addressed by a row/column
sequence so that only half the theoretically required number of address pins are needed.
The internal system stores the first half of the address and then combines it with the
second half to provide the full 16-bit address. The ULA has this facility built in, so it
doesn't require multiplexers to address the RAMs.
Note the buffer resistors in the address lines between the ULA and multiplexers IC3-4.
These allow the ULA to take control of the address bus when the screen needs updating,
irrespective of the demands of the CPU. These buffer resistors are very useful when you
are fault finding. Any loss of signal tends to be isolated to one side of the buffer,
enabling the faulty ic. to be detected. In this case if the fault is on the ULA/RAM side
removing the ULA or cutting the track will usually pinpoint the fault.
If you still have a fault, it's probably in the CPU or the ROM and a full check on the
circuit will be necessary. Table 1 shows the signals that should be present at each pin of
the main ics, with the keyboard connected and the Sinclair logo displayed, when monitored
using a logic probe (a Tandy Micronta was used). This should enable you to isolate and
replace the faulty ic.
Next month we'll look at the rest of the circuit and some of the variations and
modifications.
| Pin |
IC1 |
IC2 |
IC5 |
IC6 |
IC15 |
| 1 |
P |
P |
OC |
L |
L |
| 2 |
PH |
PH |
PH |
P |
P |
| 3 |
P |
P |
PL |
PH |
PH |
| 4 |
PH |
P |
P |
P |
P |
| 5 |
P |
P |
P |
P |
P |
| 6 |
P |
P |
P |
P |
P |
| 7 |
P |
P |
P |
P |
P |
| 8 |
P |
P |
P |
H |
H |
| 9 |
P |
P |
P |
H |
H |
| 10 |
P |
P |
P |
P |
P |
| 11 |
P |
H |
P |
P |
P |
| 12 |
PH |
P |
P |
P |
P |
| 13 |
H |
P |
P |
P |
P |
| 14 |
H |
P |
L |
P |
P |
| 15 |
P* |
P |
P |
P |
P |
| 16 |
P* |
PH |
P |
L |
L |
| 17 |
PH |
H |
P |
|
|
| 18 |
P |
H |
P |
|
|
| 19 |
H |
P |
P |
|
|
| 20 |
H |
PH |
P |
|
|
| 21 |
P |
P |
P |
|
|
| 22 |
P |
PH |
P |
|
|
| 23 |
H |
H |
P |
|
|
| 24 |
H |
H |
P |
|
|
| 25 |
P |
H |
P |
|
|
| 26 |
H |
H |
P |
|
|
| 27 |
P |
P |
P |
|
|
| 28 |
L |
P |
P |
|
|
| 29 |
P |
L |
|
|
|
| 30 |
P |
P |
|
|
|
| 31 |
P |
P |
|
|
|
| 32 |
P |
P |
|
|
|
| 33 |
PH |
P |
|
|
|
| 34 |
P |
P |
|
|
|
| 35 |
P |
P |
|
|
|
| 36 |
P |
P |
|
|
|
| 37 |
P |
P |
|
|
|
| 38 |
P |
P |
|
|
|
| 39 |
T |
P |
|
|
|
| 40 |
L |
P |
|
|
|
|